Tuesday, October 18, 2011

Halloween Candy/Pencil Holder- Mini-Monster


This month we have a fun challenge going on over at the Chica's Gettin' Crafty blog.
We want you to share your little monsters with us!! Enter the contest and you will get the chance to win a gift certificate to our sponsor this month!! Jens Digi Stamps

So, this month the design team were given Halloween digital images from Jenn to work with. I thought it would be fun to make an altered container and fill it with candy, but it's also big enough to be used as a pencil holder after the candy is gone!! Check out more details and enter the challenge over on the Chica's Gettin' Crafty Blog!!


Saturday, October 15, 2011

It's My Birthday Blog Hop- Alice in Wonderland Halloween Wall Decor

Welcome to Day Two of the It's My Birthday Blog Hop!!


You should have come here from Jen's Craft Corner. If you are coming in the middle of the blog hop, head over to

I hope you enjoyed yesterday. There were so many great projects. If you missed it go back and check them out.

I decided to combine today's Blog Hop post and my project over at The Collector's Cut. I know it's not b'day, but since my b'day is in October, I just LOVE Halloween. It is my FAV holiday! So I thought it would be fun to share this today.

HERE IS THE LIST OF BLOGS FOR THE IT'S MY BIRTHDAY BLOG HOP:


I created a Halloween Decor item.
This is a cute little wooden shadow box I picked up at The Dollar Tree.
I used the Accent Essentials cartridge to cut the scalloped edges. I used the Gypsy to weld together several pieces to make the long edges pieces.
I used the Classic Disney cartridge to cut the Alice. I made her to match the Alice that appears on the Graphic 45 paper I used. All the paper and little paper embellishments are all from Graphic 45,


SUPPLIES:
Graphic 45 Halloween in Wonderland paper and embellishments
Bazzill Bling
Buttons- vintage I inherited these from my Grandmother
Key- Dollar Spot at Michaels
Paper Flower is handmade. I bought it at a craft show. I sprayed it with Smooch Mist. Pearl
Stick pin- Recollections
Paper Clip- Making Memories
Tiny Paper Rose- Recollections
Gears- Blue Moon
Bling- Recollections Bling on the roll
Brads- Recollections
Viva Decor Pearl Pens
Beacon 3-in-1 Liquid Adhesive, Foam Pop Dots, Helmar Craft Glue


THANKS FOR STOPPING BY!! I hope you are enjoying the Blog Hop!
Leave a comment and become a follower (before midnight EST Sunday Oct 16th) here and get an opportunity to win this great Blog Candy!!

I will choose a winner at random from all the comments and followers for the weekend.

~~Enjoy~~
Daphne

Friday, October 14, 2011

It's My Birthday Blog Hop

Welcome to Day One of the It's My Birthday Blog Hop!!

You should have come here from Jen's Craft Corner.
If you are coming in the middle of the blog hop, head over to:


I hope you are enjoying the blog hop. There were so many great projects. If you missed any of the blogs....go back and check them out.

HERE IS THE LIST OF BLOGS FOR THE IT'S MY BIRTHDAY BLOG HOP:


Daphne-YOU ARE HERE!!!
Jess B -GO HERE NEXT!!


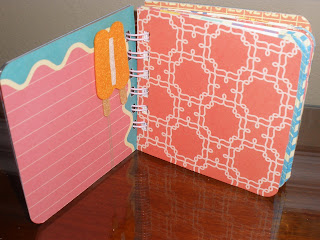
Today I want to share this cute little Birthday Mini-Album. It is all ready for the recipient to put in their photos. It is 4" x 4". The front cover is clear plastic. It is bound together using a Bind-it-All.


Thanks for stopping by! I hope you are enjoying all the projects we have to share with you this weekend.

Please leave a comment and become a follower of my blog (before mindnight (EST) Sunday Oct 16th) for a chance to win some yummy blog candy!! Check back tomorrow to get more details on the blog candy.

I will be choosing a winner on Monday October 17th at 8:00am at random from the list of comments.

~~Enjoy~~
Daphne

Thursday, October 13, 2011

Don't miss our blog hop tomorrow!!


I am in a Birthday Blog Hop this weekend. It starts tomorrow!! Don't forget!! It will start over on Addicted To Scrapbooking


Tuesday, October 11, 2011

Cookies & Hot Chocolate Gift Set

Today on Chica's Gettin' Crafty I am sharing a fun gift set. Who doesn't love cookies with hot chocolate!! Check out the details over on the Chica's blog!!

Don't forget to enter the monthly followers challenge while you are there! Share your little monsters with us and get a chance to win a gift certificate to this month's sponsor's website!

Friday, October 7, 2011

Monster Mash Lighted Canvas

I was so excited when Maggie said she wanted to post my Monster Mash canvas on her blog- Passionately Artistic.

This was a really fun canvas to make. I was walking around the store looking at the Halloween decorations the other day and saw a lighted sign. It was $20+ and I thought...gee I can make that, and it will be cuter and cheaper!

Well once it was done and I plugged it in to look at it, I was very thrilled with the results. One of my fellow crafters commented that the lights look like creepy fingers with orange nails.
But, I think the best compliment was when I showed it to my 14 yo son and he said- "OOoh I like that, can I have it." I am going to make him a lighted canvas, but he can't have this one.

I hope you find some inspiration to create a lighted canvas of your own.


STEPS:
1.) Paint the edges of the canvas with black acrylic paint. Sides and 1" in all the way around.

2.) Cut the paper to 11"x12". Use Beacon 3-in-1 adhesive to attach the paper to the canvas. I then used a brayer to roll it out to make sure it was flat.

3.) Cut and assemble Frankenstein and Bride of Frankenstein with the Cricut using the Happy Hauntings cartridge at 7"

4.) Cut grass at 1/2", fence at 2", a spider at 2 1/2", a spider at 2" and Monster Mash title at 3 1/2" (ALL MEASUREMENTS ARE THE HEIGHT)

5.) Cut hand at 1 1/2" in green and 2" in black- I attached the black hand flat to the paper and bent the green hand up so it looks like the black is a shadow of the green hand


6.) I used the Distress Inks and Gelly Roll pens to accent the images.
7.) Frankenstein and Bride of Frankenstein are attached using foam dimentional tape.
8.) I used a hot glue gun to attach the lights to the back of the canvas.

Supply list:
11"x13" Stretched Canvas
Black Acrylic paint
Piece of Halloween Paper-Die Cuts With A View- Midnight Spell stack
50 Miniature Indoor/Outdoor Lights
Hot Glue Gun and Hot Glue sticks
Cricut with Happy Hauntings Cartidge and
Bazzill Solid Cardstock
Basic Grey- Bling It Rhinestones- Spider Web
Ranger Inc- Tim Holtz Distress Ink Pads
Sakura Ink- Stardust Gelly Roll pens
Adhesives: Beacon 3-in-1, Foam dimentional tape, hot glue

ENJOY
~~DAPHNE~~

Wednesday, October 5, 2011

Sketches in Thyme-DT Sketch

I have recently discovered how fun sketches can be. This sketch is from Sketches in Thyme. I did this one in hopes of being chosen for their Design Team.
Here is the sketch they have asked us to use. You too can apply to be a SIT Maven. Click on the link above for details.

There are trials and times in your life where you find out who your true friends really are. I have been going through some things in my life and my friends have been my strength.
Melissa and I have been through some ups and downs in our friendship, but it has proven to stand the trials. In honor of our friendship this is my take on this great sketch. I think it came out pretty.

I used the Girls' Paperie by Margie - Paper Girl line. The shaped patterned paper, vintage buttons, clocks, rose, charm and little word stickers are all from this line. The solid cardstock is from Bazzill. The dotted patterned paper is Serendipity-"Scrumptious"- Coconut Cream. The ribbon is from my stash.

The title is cut with the Cricut using the Billionaire cartridge. The inking is using Tim Holtz Distress Ink- Vintage Photo. The flower and clocks have been sprayed with Smooch Spritz- Vanilla Shimmer.

I used my ATG gun and Beacon 3-in-1 Adhesive.


Tuesday, October 4, 2011

Shaped Card Challenge-The Collectors Cut

I am very excited to share with all of you that I was asked to join in the fun over at The Collectors Cut blog. We will be making two projects a month over there. All the projects are using the Cricut machine. We are hoping to get more use out of the cartridges we have and to inspire some of our crafty friends to get out their Cricuts and use all those wonderful cartridges you own that are collecting dust!!

The challenge this time was to make a SHAPED CARD.
I decided to use a cartridge I had not used yet for my own personal goal of using all my cartridges in 2011, and I chose Wild Card.
I cut out the quote bubble card. Then I flipped it and cut it again, because I didn't use double sided paper! I glued the two together so there was pretty paper on the inside.
I used the EK-Success flower punch on the owl in the center of the card and the Stampin-Up Banner punch on the little guy on the bottom right.
I love to ink and I used Tim Holtz Distress ink in Vintage Photo.
The words are also cut from the Cricut using the font on Wild Card. I welded it using my Gypsy before cutting at 1".
I used Helmar Acid Free Adhesive to put it all together.
The paper is from Target in the Dollar Spot. It is all from the new owl fall pack. It was purchased only a couple of weeks ago! It is SOOOOooo cute!

Get out your long lost cartridges and start crafting!!

Monday, October 3, 2011

Crafty Chicas Halloween Decor


This month the design team was asked to use Orange, Purple and Black in celebration of Halloween. I thought it would be fun to make a really neat free standing tri-fold decoration. I am eager to get this out and display it in my house.
You can get more details over at the Chica's Getting Crafty Blog.
Don't forget to join the blog challenge this month. Share with us your monsters and get a chance to win a gift certificate to the web site.

I wanted to share my decor so I entered it in the following Challenges: